Problems with sinks, drains, faucets, and other plumbing fixtures are a major cause of household repair bills throughout Southeast Wisconsin, such as that persistent “drip, drip, drip” from a leaky faucet. Most faucet leaks are caused by a worn-out washer (rubber or synthetic ring inside the faucet), or O-rings and corroded valve seats. Besides the annoyance, a worn-out washer is a source of wasted water and higher water bills.
Here’s what to Do.
Common tools you’ll need for faucet repairs include screwdrivers (both flat and Phillips), pliers and a channel lock (adjustable jaw pliers). Then follow these easy steps:
- Turn off the water supply to the sink. Valves are usually under the counter close to the wall. It’s also a good idea to close the sink drain so any small parts that fall into the sink don’t go down the drain.
- Open the faucet to release any water pressure in the lines.
- Remove the handle, which is usually held in place with a screw or Allen screw (screws with a hexagonal pattern in the head). The screw may be covered with a plastic, metal or rubber cover you’ll need to pop off using a flat screwdriver or butter knife.
- If the faucet has a large metal nut holding the internal parts in place, check to see if it’s loose. Tightening that nut with a channel lock pliers may stop the leak. If not, remove the nut, screw or spring-loaded metal ring that holds the internal parts in place.
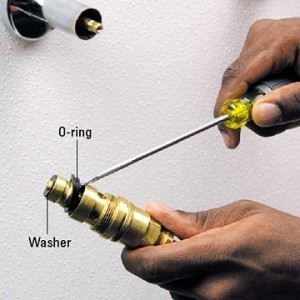
- Pull out the internal pieces with a pair of pliers or the channel lock pliers, carefully noting how the pieces fit together. If the faucet contains a cartridge, don’t take it apart; simply replace it with a new one. It’s possible to install cartridges backward so you get hot water when you expect cold, and vice versa.
- Replace the washers, O-ring or seals (and springs if there are any behind the seals in a ball faucet). Get precise replacements from the hardware store. Remember it takes only a small gap to allow water to pass through. Hot and cold assemblies may have slightly different parts.
- If metal parts have mineral deposits on them, clean them with vinegar and a stiff-bristled brush, being careful not to scratch the metal. In some instances, the uneven metal is the cause of the leak. You can get special tools to re-cut the metal of some faucets to make it smooth again, but it may be just as easy to replace the whole faucet if that’s the case.
- Reassemble the pieces and turn on the water supply to test your work. It may take a few seconds for the air to get out of the line, so turn the water on slowly and expect a bit of sputtering.
But…what if your faucet still drips after you put it all back together? Well, at that point, you have two primary options. First, you can go to a hardware store and buy a valve-seat cutter; a seating tool can also be used to resurface a worn seat.
Again, remove the spindle. Looking into the body of the valve—at the bottom—you’ll see its base or “seat.” Using the directions you get with the seating tool, grind away the nicks in the “seat” until it’s smooth. Those nicks let water through, causing the drip. Now that the washer and seat can fit tightly against each other, your problem should be solved. (To repair some single-lever faucets, you will probably need to purchase a repair kit for that particular brand).
However, if none of the above seems to work and your faucet is still leaking, your friends at Blau Sudden Service would be more than happy to repair any leaky faucets around the house.
1-800-BLAU-NOW | (414) 626-1991
Click here to ask questions or schedule service now